Tuesday, January 26, 2016

Cane Back Sofa Encore Part 2

Hi all,

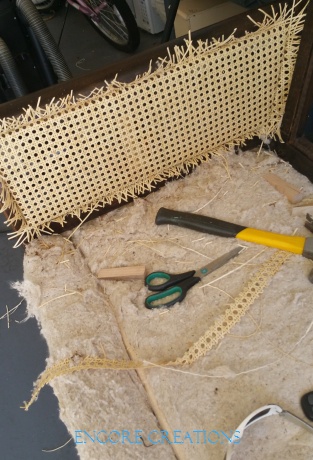
After replacing the cane that had holes in it, I added new webbing. This is when I discovered we were missing a leg!


After searching online and locally, I decided my best ( size and price) choice was this leg from HD.


I was able to find just the right place on this leg to cut off the excess so that I had 3- 9" legs. I had to put dowel screws in the legs to screw them into the sofa. 


This was the hole for the missing leg. I cut a piece of 3/4" dowel to insert in the hole for the new leg. You can also see where the wood split directly across the middle of the hole. I put Titebond Wood Glue along the crack and used clamps to pull it together.   The "plug" was glued in with Titebond Wood Glue. The 5/8" dowel screw was then screwed into this "plug". I had to do this for 2 of the 3 legs. On the 3rd leg I cut off and left the original wood tenon in the hole.  

After  we got all three legs on, it was on to painting this baby! I took a piece of the treated drop cloth that I was using for the upholstery to HD and had it color matched for a monochromatic look. 

I love how soft and "creamy" this drop cloth is after a few (3-4 for this x -large size) bleach baths and soaks. If using drop cloths, remember to take all hems out and you will gain a couple of inches.
 After bleaching repeatedly, put into the dryer so it will shrink before your cut your pieces.

 After 2 good coats of paint I used Annie Sloan Clear  Soft Wax over the paint.
Next, it was on to the cushions and upholstery. The cushions looked a little thin to me and , not wanting to spend over $60.00 just for foam, I decided to cover the cushions with 1" batting. I got a great deal on the batting at Fabric World in Stone Mountain, GA. The cushions looked nice and plump. Great fix, or so I thought!!  (Sorry, thought I took pics of them, but guess not). Once I put them on the sofa they were too plump, the scale was all off. So, I had to take the batting off and cut down the cushion covers to fit the original foam. Note to Self: bigger is not always better!!  I also discovered that each cushion cover needed to be cut separately as all three foam pieces were not identical in size. 
Finally, I had reupholstered the sofa and made new bolster pillows.

Here she is before and after..

Well, what do you think? Would you tackle replacing cane or would you have passed this one up? For me , it was worth it to learn a lot more about furniture repair, restoration and Encores!!


Friday, January 15, 2016

Cane Back Sofa Encore Part 1


Hi all,

As promised in my last post, I'm sharing one of the projects that I finished near the end of the year. I will share this project in 2 parts. So...

Late this summer my cousin sent me a text that included a picture.


I laughed when I got her text because I had seen the sofa the day before. I didn't buy it even though I loved it and the price, but left it there as I already had a sofa in my garage waiting for its Encore.

She bought it, and asked me to give it an Encore. This would require repairing cane sections that had holes in them, painting it and reupholstering it.


The first thing I did was look up how to repair the cane sections. My experience with basket weaving helped a lot, but  there was still more to learn. I knew I could order replacement cane online, but chose instead to look for cane and advice from a vendor at Scott's Antique Market.


I had bought supplies previously from Walter Smith , the owner, and knew he would be a great source of info. After a visit and very helpful conversation with Walter, I purchased the cane. I would later make a 2.5 hour trip to Augusta to purchase the correct size spline. I knew I could order the spline from the Furniture Doctor online, but am so glad I let my fella make a day trip out of it and drive me to Augusta. I was so going to buy the wrong size spline!! Dodged a bullet and came home with the right spline.


First, I cut out the cane and then removed the spline. There are lots of videos on Youtube showing how   to remove the spline, I watched a few, then did my own thing!


I first used an Exacto knife to cut along the spline. I did this on both sides of the spline.


Using my rotary tool with a cutoff wheel,  I severed the spline and was able to pry it up. From there, it was pretty easy to remove the spine up using both the rotary tool and the putty knife.


After all the spline was out I sprayed the groove with a vinegar and water solution to loosen the glue that was used to secure the previous spline and cane.

For some reason, I decided to remove the upholstery fabric next. If I were to do this over, I would leave it on until all the cane and spline had been replaced.


After soaking in water for about 20 minutes, the cane was carefully lined up and wedges were used to hold the cane in place temporarily.


There was still a lot to do to give this piece its Encore, stay tuned for Part 2 of the Cane Back Sofa  Encore.


 photo signature_zps7c00ce20.png


Thursday, January 7, 2016

Table Leg Repair - Second time around!!


Hi all,

Well, it's a new year and I'm setting goals and making plans that I think will seriously change my life. Stay tuned. Last year was a busy year with lot's of projects, many of which I have yet to share with you. Again, stay tuned!! Here's a quick one that I want to share.

A few years ago I bought a round dining table at the GW that required a repaired leg and an Encore. You may remember the Encore, I wrote about it here. And here's a picture after the Encore....


Circle shows where leg failed.

This table has been the base for my Christmas village since I bought it. Well, earlier this summer the same leg that was "wonky" when I bought it, failed again.
 I had redrilled holes and used new bolts but it only lasted about 3 years. Not wanting to get rid of it, I set out to repair it again.
Since the leg actually split down the center, I thought I'd just cut two pieces from a 2 x 6 and glue them together, drill holes and done.


I traced the leg sections on the board. Before I cut the sections, my son Brandon saw something I didn't. Since the original leg separated neatly down the middle, why not just put it back together and use it. Duh!!


Made sense to me so I used Titebond Wood glue on the original leg sections.  I clamped the leg and gave it 24 hours to dry. To ensure that they didn't separate any time soon, I drilled 2 - 1/2 " holes in the leg, put wood glue in the holes and tapped in 2 wood dowels cut the thickness of the leg.


The old bolts couldn't be used as they entered the leg right in the center, so I marked and drilled new holes.

This was almost too easy. And imagine all the extra work I was going to do to fix this. Good looking out for your mom, Brand. My table was repaired at no additional cost and was ready for Christmas 2015 and the village. You can see it in the pictures of my Christmas Village, "Burtsville".


  Hand painted village with 50+ buildings. I started painting these in 1982!  Over the years we lost about 5-6 due to our cat and a very "vertical display" back in the day!! The whole family got in on it and painted at least 1 building. I know this post is about the table but I just love to share pics of my village...


                         Rural area complete with horses, goats, ducks and raccoons in the garbage!!

  Main street contains everything from a gas station, airport, drive in diner, car lot, train station, airport, craft store, drug store, Christmas shop and Santa's Toy Shop, and more...


The Town Square has businesses ( on the table top) and mansions on the two upper levels as well as a church complete with an outdoor Nativity scene. There are working street lights, Christmas lights on some of the trees. There are over 300 people, at least 12 dogs  and 3 skating ponds.

Now you see why that table was so important to me. It's the foundation for this whole village. As  I move into this year watch for lot's more from Encore Creations.


 photo signature_zps7c00ce20.png